Jan 16

Connecting GNS3 to loopback interface

While working on GNS3, it may require to connect physical interface of machine to activate more advance features. Specially installing ASDM , you definitely need to create MS loopback interface. So I thought to make a quick guidance for those who struggle with connecting GNS3 to loopback interface. At the end I have provided solutions for common issues which I faced connecting GNS3 to loopback interface.

1) Open “Device Manager”

Computer –> system properties –> Device manager

2) Add legacy hardware

Right click on “Computer <name>” then select “Add legacy hardware

Add legacy hardware


3) Follow the Wizard

select “Install the hardware that I manually select from the a list
then
select “Network adapters


network adapters


then
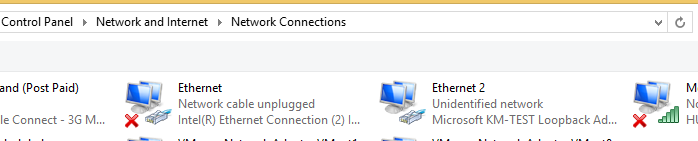
Choose Manufacture as Microsoft and select “Microsoft KM-TEST Loopback Adapter
then install the adapter, it may take some time to complete.


Microsoft KM-TEST Loopback Adapter


4) Assign IP address to Loopback interface

Open Network and sharing center
and assign IP address

ex:- 192.168.10.20 / 24

loopback interface


5) connecting GNS3 to loopback interface

i) Add cloud to GNS3 work area

ii) Right click on cloud select “Configure”

iii) Inside the “Ethernet” tab select your loopback interface and add like below


GNS3 cloud config


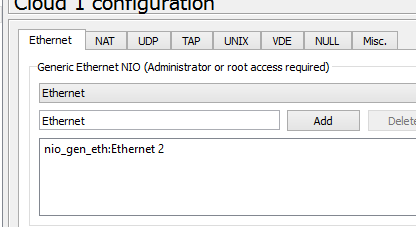
Note:- You can connect this cloud to Router , ASA etc, But it is recommended to put Ethernet Switch between device and cloud instead of directly connecting device to Cloud.


Common error and solution

Error!

Server error from 127.0.0.1:8000: SW1: unable to create generic Ethernet NIO

Solution :-

1) You need to reboot the computer

2) If step 2 does not work you may be need to reinstall GNS3 🙁


Please put your comments here. I may can help you to fix them !


Jan 14

How to install ASDM in GNS3

Installing the ASDM in GNS3 environment is little bit challenging. The reason is ASDM application cannot be installed just like normal software. Firstly asdm-xxx.bin should be uploaded to ASA Firewall and then continue installation process by downloading special msi file which is given by
ASA Firewall. This tutorial guide you how to install ASDM in GNS3 . You can find a way of configuring Cisco AnyConnect VPN from here.

ASA and TFTP Server ip addresses

ASA interface ip :- 192.168.20.20 255.255.255.0
Loopback interface / TFTP server ip :- 192.168.20.10 255.255.255.0

1) Add ASA, Switch and Cloud as below

Refer this article for how to configure ASA on GNS3
ASA ASDM GNS3


2) Connect Cloud to MS loopback interface

Refer this for how to configure MS loopback interface for GNS3

Microsoft loopback interface ip :- 192.168.20.10 /24

3) Install TFTP server

Download and install preferred TFTP server such as solarwinds, 3CDaemon

this tutorial use 3CDeamon
3CDaemon Download :- http://www.firewall.cx/downloads/16-1-3cdaemon-server-a-client.html?path=

4) Check 3cdaemon listening to loopback ip

just open the 3cdaemon you will see similar output if it working correctly.

3CDaemon port listening


5) Upload ASDM bin file to TFTP server

i) Click on “Configure TFTP Server”

ii) On the Configuration windows either copy ASDM-bin file to Upload/Download directory or set the path where ASDM bin file located.

3CDeamon upload filelocation


6) Upload ASDM to GNS3  ASA

i) inside config mode execute following command
assuming TFTP server ip as 192.168.20.10

ciscoasa#configure terminal
ciscoasa(config)#copy tftp disk

and follow the process, you need to provide TFTP server ip address, ASDM bin file name etc..

7) Activate ASDM bin file and web access to ASA

i) Configure ASA interface.

ii) Activate ASDM image

iii) Configure login credentials and https access

iv) Reload the ASA


8) Install ASDM windows

i) log into ASA over web browser

https://192.168.20.20


Install ASDM


ii) Install ASDM by downloading msi installer

9) Launch the ASDM

provide ASA interface ip and login credentials to login to ASA


Dec 21

How to setup CISCO ASA in GNS3

Few years ago I wrote article about how to setup CISCO ASA in GNS3 , and recently I realized that, instructions are not compatible with newest GNS3. The Original article can be found from here on my old blog . So I though to re create new tutorial on my WordPress blog.
Following download file contains required images for CISCO ASA 8.4 and ASDM 6.4 bin file.

[1] Download CISCO ASA image for GNS3

here is the link :- http://www.mediafire.com/download/c228c2sjdyrkwf3/ASA_842.7z
This file contain with initrd, vmlinuz and asdm 6.4

In any case above links are not working use following alternative link to download the file :-
link 1 :-  http://ge.tt/9RjhgNs/v/0?c
link 2 :-  https://www.box.com/s/3fybjit5jsudhwyvqwz8

[2] Download & Install GNS3

You can download latest version from
http://www.gns3.net/download/
or
http://sourceforge.net/projects/gns-3/files/GNS3/

[3] Configure GNS3 for CISCO ASA

(i) Open GNS3, then select “Edit” –> “Preferences..

(ii) Expand “QEMU” and choose “QEMU VMs” then select “New

(iii) Select ASA 8.4 from the drop down and continue. you may need to set NAME for ASA and define RAM for it.

QEMU ASA


(iv) Finally You need to give file location of Initial RAM disk (initrd) and Kernel image (vmlinuz).


QEMU VM template


[4] Configure activation keys

you can use one of below activation key
0x4a3ec071 0x0d86fbf6 0x7cb1bc48 0x8b48b8b0 0xf317c0b5
0xb23bcf4a 0x1c713b4f 0x7d53bcbc 0xc4f8d09c 0x0e24c6b6

for example :-

Now we have successfully installed CISCO ASA 8.4 on GNS3 and ready to have some fun from ASA  🙂

Older posts «

» Newer posts

Fetch more items