Today I would like to discuss quick way of implementing AnyConnect SSL VPN client using ASDM . Before that let’s go through why need VPN and it’s type in briefly .
Why we need / use VPNS
it is simple because of C I A (Confidentiality , Integrity of the data, Availability)
Types of VPN
01) Remote Access VPNs (RA)
i) SSL no client software (clientless SSL VPN)
* Client-less SSL VPN requires a browser that support SSL/TLS, and uses the public PKI (Public Key Infrastructure)
ii) SSL FUll Tunnel with AnyConnect client software
*Client is assigned a ip address from ip address pool
* Client computer should have admin rights to install Anyconnect software
* Anyconnect software ask groups when connecting and it is referin to ASA’s connection profiles ( tunnel-groups )
iii) IPsec RA Full Tunnel VPN Client or AnyConnect
* VPN Client only support IPsec but AnyConnect support both IPsec and SSL
2) Site to site VPNs
IPsec Site to Site VPN – peer to peer Gateways
SSL Tunnel Types
* Full tunnel :– Client machine sends all traffic to vpn tunnel even internet traffic. (can’t browse internet or can’t access LAN )
* Split tunnel :- Client machine only sends vpn traffic to the tunnel while internet traffic physical interface. (can browse internet or can access LAN )
Below is most essential components of AnyConnect SSL VPN. Let’s look at how join these pieces together and configure the VPN
i ) Connection Profiles
ii ) group
iii) users
iv) Address pool
v ) tunnel only (Full or split )
01) Create group policy
“Configuration” –> “Group Policies” click on “+ add”

then set ‘group Name‘ and ‘Address pool‘ which is going to assign to vpn clients
02) Split tunnel
On the “Add Internal Group Policy” window which use on step 01 , click on Advanced to expand “split Tunneling”
untick “Policy” Inherit and choose “Tunnel Network List Below” from drop down.
You need to define (by clicking manage) vpn pool ip address range from “Network List“, then only split tunnel starts to work

Click “ok” and apply it to ASA
03) Create Connection Profiles
Go to “configuration” –> “AnyConnect Connection Profiles”
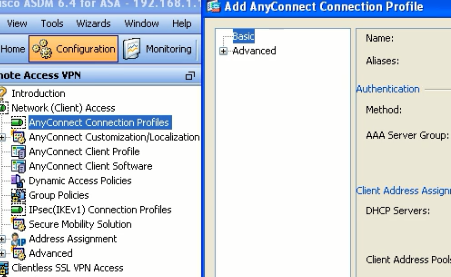
i) define connection profile name
ii) Select “Client Address Pools”
iii) Choose “Group Policy” Which is created on previous step
Click “ok” and apply it to ASA as previously did
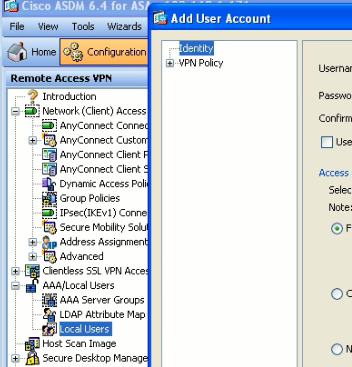
04) Add new User
Go to “configuration” –> “AAA/Local Users” then select “Local Users”
Set Username and password for new user and Privilege level as you need
Then select “VPN Policy” and left hand within same window. select correct previously created “Group Policy” from drop down
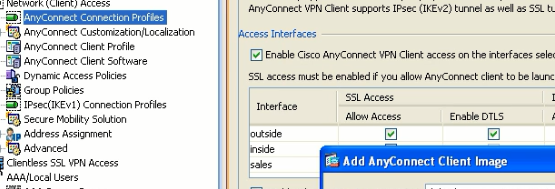
05) Enable Anyconnect connection to ASA
Go to “configuration” –> “AnyConnect Connection Profiles”
tick “Enable Cisco AnyConnect VPN client access on the interface selected in the table below”
make sure your correct interfaces are ticked
bonus :- this will ask to Add AnyConnect Client image, if you have you can configure this as well
06) Connecting AnyConnect SSL VPN
Launch AnyConnect Software, enter ASA vpn gateway ip address then select correct Group and enter username and password
07) Verify VPN
Go to “Monitoring” –> select “VPN” from bottom then select “sessions” , it will display all vpn session and you can filter AnyConnect VPN session from there.